Supa Ant Water Bath Canning Kit Review: A 24-Quart Canner Kit for Beginners
This page reviews the Supa Ant Water Bath Canning Kit, which is ideal for beginners wanting to can jams, jellies, and pickles. It includes a 24-quart pot and essential tools but is only suitable for certain stoves and high-acid foods. Find out what's included, check stove compatibility, and learn basic safety tips before buying.
As an Amazon Associate I earn from qualifying purchases.
When the garden comes in all at once, water bath canning is one of the most rewarding ways to put food by: jams, jellies, pickles and properly acidified tomatoes and salsas. It’s also where a lot of people get stuck gathering gear. The Supa Ant Water Bath Canning Kit puts a 24-quart pot, a canning rack, a lid and the core hand tools in one box. Here’s what’s in it, what it can’t do, and the safety basics every beginner should follow.
What’s in the Kit
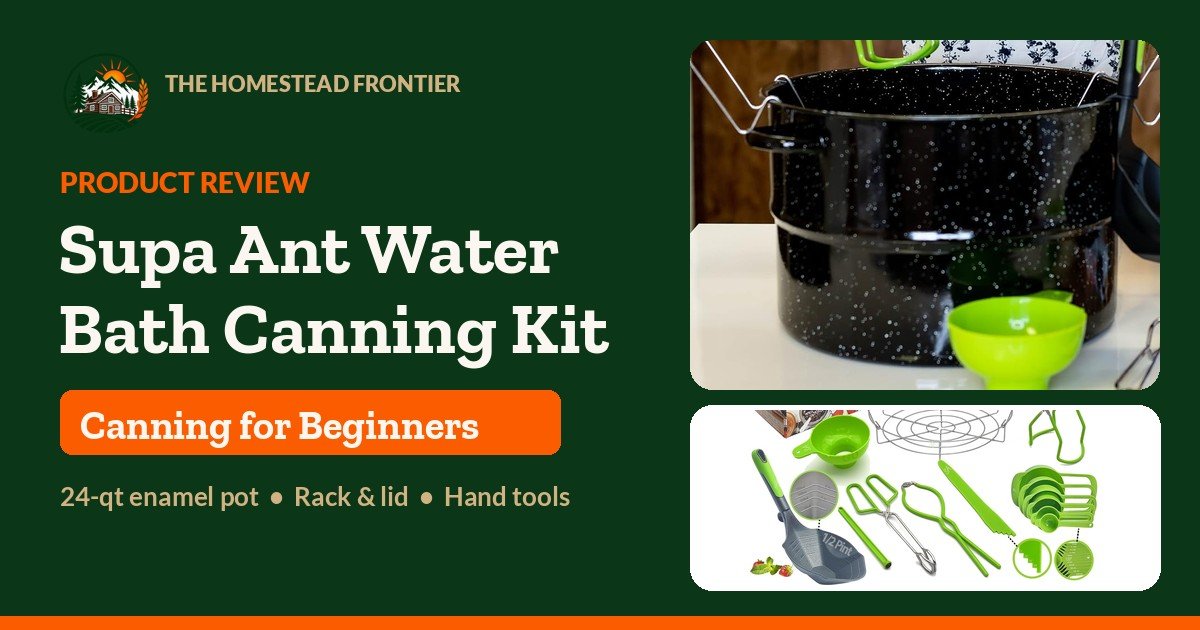
The centerpiece is a 24-quart pot in black speckled porcelain enamel over a steel core. It’s classic enamelware, not stainless steel (the Amazon listing title says “stainless”, but Supa Ant uses that word for the utensil set). Supa Ant describes the pot as lightweight, PFOA- and PTFE-free and dishwasher friendly, and it comes with a lid and a canning rack.
- 24-quart porcelain enamel-on-steel canning pot with lid
- Canning rack to keep jars off the bottom of the pot
- Canning funnel
- Jar lifter
- Bubble popper / headspace measurer
- Magnetic lid lifter
- Jar wrench
- Canning tongs
- Large canning scoop with 4 oz and 8 oz markings (Supa Ant says it holds more than a half pint)
- Set of 6 measuring cups
- “Homemade” jar labels
- Storage box for the tools
The tools have bright green accents, so they’re easy to spot on a busy counter in the middle of a big batch. Jars, new lids and bands are not included, so budget for those separately.
Stove Compatibility
Supa Ant says this pot is not suitable for induction or glass cooktops. That rules it out for a lot of modern kitchens, so check your range before you buy.
On an electric coil range, the National Center for Home Food Preservation (NCHFP) says the canner bottom should be fairly flat, and to ensure every jar processes evenly the canner should be no more than 4 inches wider in diameter than the element. Centered on the burner, it shouldn’t overhang the element by more than 2 inches on any side. Supa Ant doesn’t publish the pot’s diameter (Amazon lists the item at 14 x 14 x 12.4 inches), so measure the pot bottom and your largest element before you plan on a coil stove. NCHFP notes that either a flat or a ridged bottom can be used on a gas burner.
Water Bath Canning Is for High-Acid Foods Only
This is the most important thing to know before you start. A boiling water canner is only safe for high-acid foods, or foods acidified according to a tested recipe:
- Good for a water bath: fruit jams and jellies, fruits, pickles, and tomatoes and salsas that are properly acidified by a tested recipe (tested tomato recipes call for adding bottled lemon juice or citric acid).
- Needs a pressure canner: low-acid vegetables, meats, poultry, seafood and broth. A water bath can’t process these safely, and this kit doesn’t include a pressure canner.
Always Use a Tested Recipe
Follow a tested, up-to-date recipe every time, such as those from the National Center for Home Food Preservation (NCHFP) or the USDA Complete Guide to Home Canning. The recipe sets the jar size, headspace, processing time and altitude adjustment for that specific food. Don’t guess or improvise with old family recipes that haven’t been tested.
Boiling Water Canning Basics (from NCHFP)
These steps summarize NCHFP’s “Using Boiling Water Canners” guidance. Your tested recipe has the details for each food.
- Put the rack in the bottom of the canner and fill it about half full of warm water for a load of pint jars, adjusting so it will end up 1 to 2 inches over the filled jars.
- Preheat the water: 140°F for raw-packed foods, 180°F for hot-packed foods.
- Load the filled jars (lids and bands on) one at a time with a jar lifter, keeping them upright.
- Make sure the water is at least 1 inch above the jar tops, or 2 inches for process times over 30 minutes. Add boiling water around the jars, not directly on them, if needed.
- Cover, heat on high until the water boils vigorously, then start the timer. Keep a gentle but complete boil for the whole process time.
- If the water stops boiling at any point, bring it back to a vigorous boil and restart the full process time from the beginning.
- Adjust the processing time for your altitude as the recipe directs.
- When time’s up, turn off the heat, remove the lid and wait 5 minutes, then lift the jars out upright onto a towel or rack with at least 1 inch between them.
- Let the jars cool undisturbed for 12 to 24 hours before checking the seals. Refrigerate any jar that didn’t seal and use it first.
Honest Limitations
- Enamel, not stainless. Enamelware can chip if it’s dropped or knocked. Amazon’s review summary mentions some reports of chipping.
- No induction or glass-top use, per Supa Ant.
- Coil stoves need a size check. Follow NCHFP’s rule that the canner be no more than 4 inches wider than the element.
- Water bath only. It can’t safely process low-acid foods like vegetables, meats or broth.
- Jars, lids and bands aren’t included.
- No published pot diameter, interior depth or jar capacity. Before you plan a load of tall jars, check that your jars fit on the rack with at least 1 to 2 inches of water over the tops.
- Warranty and support are as advertised. Supa Ant advertises a 365-day warranty and US and UK customer care. We haven’t tested either.
Who It’s For
This kit suits beginners with a gas stove (or a coil burner that fits the pot) who want to start water bath canning jams, jellies, pickles and acidified tomatoes and salsas without shopping for each tool separately. If you cook on induction or glass, or you mainly want to can green beans, meats or stock, look elsewhere: you’ll need a different canner, and for low-acid foods a pressure canner.
The Bottom Line
The Supa Ant Water Bath Canning Kit is a convenient way to get most of your water bath canning gear in one box: a 24-quart enamel-on-steel pot with lid and rack, plus the hand tools that make canning day go smoother. Add jars and new lids, make sure your stove suits the pot, stick to high-acid foods, and always follow a tested recipe from a source like NCHFP.
Prefer to watch or listen? More practical homestead tips are on our YouTube channel — short, useful, no fluff.
Get Weekly Homestead Know-How That Actually Works
Practical tips on gardening, food preservation, DIY repairs and self-reliance, straight to your inbox. Free, no fluff.
Free. Unsubscribe anytime. We never share your email.